
Australia is such a unique destination for everyone, but specifically for Filipinos. It’s less than a 10-hour flight from the Philippines (direct), and it offers a fun experience and a culture of the West.
The Australia visa application for Filipinos is probably one of the most confusing but at the same time the most convenient visa I applied for.
I love that I don’t have to go to an Embassy or visa centre to lodge my application since an Australian tourist or visitor visa is now through an online application. I also didn’t have to book any flights, travel insurance, or car rentals.
But at the same time, the list of documents to prepare and steps to take are very confusing. Their official website appears to be “in order”, but the more I dug into it, the more I realised that they could make their website more helpful and straightforward.
In this guide, I will walk you through the steps of applying for an Australian visa application for Filipinos based on my own experience. I will show you a list of documents to prepare, the cost, how to apply, tips before you apply, and answer basic but vital questions.
You can also read our list of visa-free countries for Filipinos and how to apply for a US visa or Schengen/Europe visa.
BASIC INFORMATION ON AUSTRALIA VISIT VISA

Before you start lodging your application, you should know some details. Below, you will find information on the difficulty level of applying for an Australian visa, the process time, cost, and more:
Visa difficulty
I personally would say that an Australia visa is somewhere between mid-high to high difficulty. It’s not as scrutinised as the US visa, but a bit more challenging than the Schengen visa.
How much does an Australia visa cost
The visa for Australia visitor visa costs around AUD$190, although you will be paying it in Philippine pesos (PHP), so that’s around PHP 7,000. This doesn’t include all other costs such as biometric collection (PHP950), and other expenses such as reserving a flight, hotel, travel insurance, and such.
Australia tourist visa processing time for the Philippines
This depends, but on average, the visa processing takes about 18 to 25 working days from the day you lodge your application. You will most likely be required to collect your biometrics a few days after submitting your application online.
Where to apply for the Australia visa
The visa application is now all digital. You don’t need to use a travel agency or a third-party partner such as VFS (except the biometric collection). You will submit all your documents to the official Australia visa website.
How soon can I apply for an Australia visa
Most websites say you can apply as early as four months before your trip. Some say that at least three months.
I applied four months before, and the only thing that I recommend is to send your application no later than 2 months before your planned travel date.
On average, it takes 18 days for the Embassy to process the application. However, I’ve seen other people’s applications taking almost 29 days. So, if there are public holidays in between, you should take that into consideration when deciding when to send your application.
Can we apply as a group?
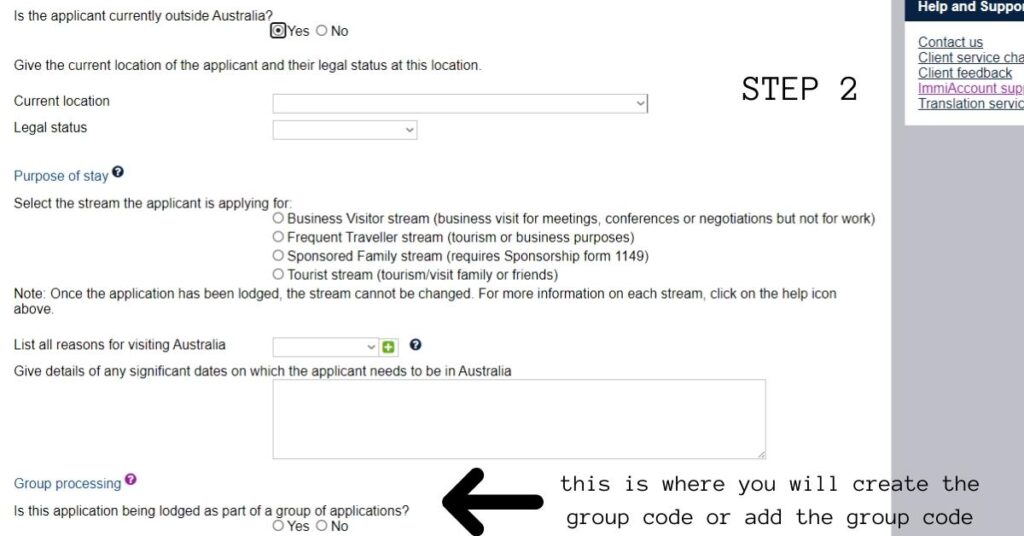
Yes, but each application (including minor) must create an individual Immi account. One person in the group will create a group during their signing up process of the Immi account. The system will provide a group code. This group code must be used by all members of the group.
AUSTRALIAN VISA REQUIREMENTS FOR FILIPINOS
All documents should have a digital version since you will be uploading them on the website. Make sure that you have signed the documents where a signature is needed (form 54, cover letter, passport).
- passport bio page
- passport all pages – as proof of no travel history or pages with stamps on
- ID picture (passport or 2×2, white background, showing both ears, no jewellery and no glasses)
- birth certificate
- family composition – fill out form 54
- certificate of employment and/or work contract
- work ID
- bank statement – at least 3 months
- bank certificate – addressed to the Embassy of Australia
- payslips – from the last 6 or 3 months
- ITR
- travel itinerary
- hotel bookings – hosting letter if staying with a family or friend in Australia
- flight – I submitted a screenshot of the flight I plan to book
- cover letter
- NBI – not sure if this is still needed, but I submitted it anyway
- biometrics – you will get this collected at VFS in Makati after you submit your application
- DTI – if self-employed
- land title – if applicable
- For students:
- school ID with updated school year
- school registration
- marriage certificate of parents – if minor
- DSWD letter – if travelling with one parent only
- both parent’s passports- if travelling with guardian and not the parents
- With a host
- invitation letter
- form 1149 – if being sponsored financially
- passport or residence card of host
STEP-BY-STEP GUIDE ON APPLYING FOR THE AUSTRALIAN VISA APPLICATION FOR FILIPINOS
Since the Australia visa application for Filipinos can now be lodged online, you don’t need to print your documents, instead make sure that you have digital copies since you need to upload them.
Step 1: Go to the official site and create an account (if applying as a group, each applicant should create individual accounts, but one of them must create a group and get a group code that everyone will use on their own accounts).
Step 2: There are about 19 pages to fill out. You will provide all your personal details, family details (parents and siblings’ birthdays and addresses), work background, travel history, and travel plans.
Step 3: After that, you will upload or attach your documents according to their categories.
- You don’t have to do this in one sitting, you can save it and come back later.
- Make sure that you double-check all the information before submitting it completely.
Step 4: Once submitted, you will be directed to the payment page (debit card and credit card accepted).
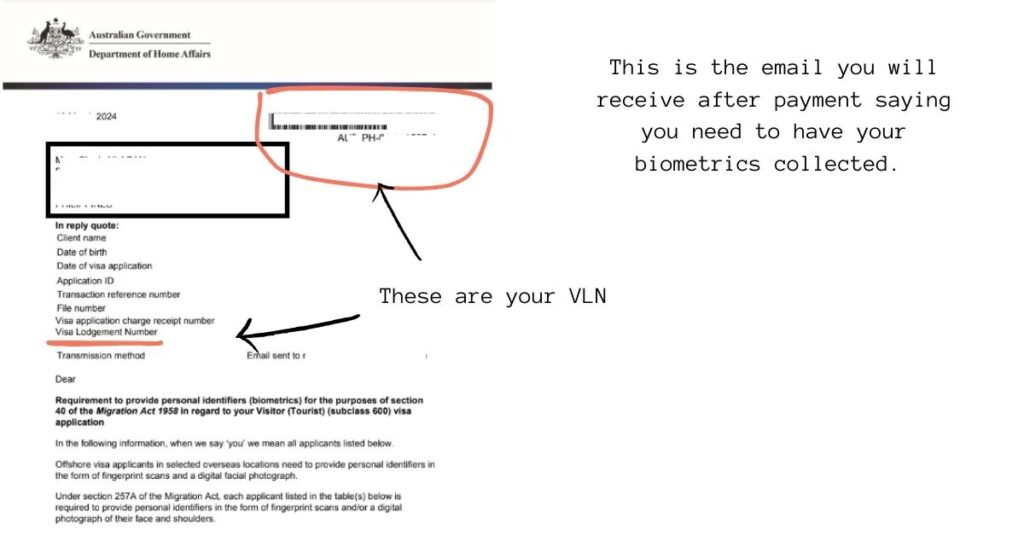
- After payment, you will receive 2 emails in about 5-10 minutes: the confirmation of your application and an email that instructs you to get your biometrics collected (s40 form).
Step 5: Go to this VFS site to create an account and then book an appointment for biometrics. You will be required to enter the visa lodge number (VLN) before you can proceed.
- Choose the date (you have to send your biometrics no later than 14 days from application submission) and time.
- Pay the VFS fee on the appointment date. Bring a copy of the appointment, your s40 form, a photocopy of your passport, and your passport.
- VFS will send the biometrics copy to the Australian Embassy, but you can also log into your Immi account and attach the VFS (biometrics result) file under “travel document” and click “I confirm that I sent all the required documents”.
Step 6: Wait to hear from the Embassy (if you need more documents or about the decision).
VISUAL GUIDE





FAQ
- Is it better to be self-sponsored or sponsored by someone in Australia?
- You should decide depending on accuracy. If you can afford it, do a self-sponsored, and if a family member is paying for the flights, you can declare that too.
- Being financially supported could mean that the host from Australia has to sign another form (form 1149) and might be requested to send a bond for up to AU$20,000, which will be held until you leave Australia.
- Being provided a place to stay (e.g. you will stay in their house during your visit), only requires an invitation letter.
- How soon should I apply?
- I would say that as soon as you know your intended travel dates, gather your documents and plan to lodge as soon as 3 months before your target date.
- Do I have to pay the visa fee right away?
- Yes. The moment you submit your application, you will pay right away via digital payment.
- Can I pay in cash?
- No, only payment with bank cards (debit card or credit card – anything that has card number, expiration, and CVV code)
- Is the visa fee refundable if denied?
- No, the tourist/visitor visa fee is non-refundable.
- Do I need to book my flights in advance?
- No, you can screenshot the tickets you plan to book if/when approved and attach this under “planned activities”.
- Do I need to book hotels in advance?
- Suppose you’re staying in a hotel, yes. I always use this site because I can cancel the booking up to the last minute for free).
- Is there an Australia visa sticker?
- No, it’s a paper that you have to print and show to the immigration officer (both in the Philippines and in Australia).
- Is there a visa stamp in Australia?
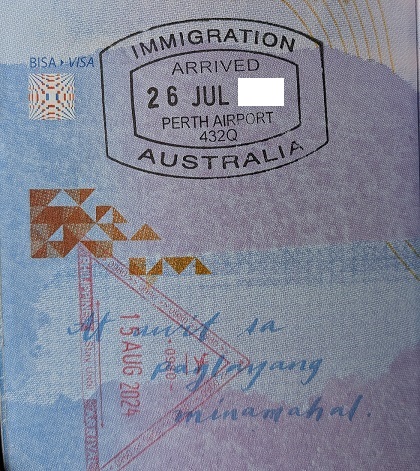
- It is not common, but ask the immigration officer for a stamp, and you will be taken to the supervisor and have your passport stamped.
- Can I re-apply if my visa was denied?
- Yes, you can apply as soon as possible. The rejection letter will show you the reasons why you were denied. Let’s say it said that it’s because you were not able to prove that you have enough funds. If you can fix this, do that before re-applying.
FINAL TIPS
I love my experience with applying for the Australian visa application for Filipinos. It’s the first all-digital actual visa (meaning not evisa), that I submitted for.
The stress and anxiety of going to the Embassy or being evaluated by a staff face to face is gone. Don’t get me wrong, the moment I submitted my application, I was still nervous the whole time.
But not having to line up at the Embassy or VFS or something like that helps my mental state a bit. Plus, for applicants that do not live in Metro Manila, this makes the lodging much easier.
Final tips, if you have documents that you forgot to add or upload, you can always log into your Immi account and still sumbit those. But do it no later than 3 days after you lodge your application and have taken the biometrics collection.
I really hope that you found this guide helpful in applying for your visa for Australia from the Philippines.